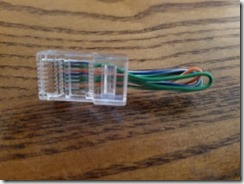
Sometimes you need to prove that an Ethernet port you want to use is in good working condition, but maybe you’re having problems confirming continuity across the port to the next piece of equipment. A simple solution is to create a Loopback (LPBK) Plug and plug it into the port in question. If the port is in good working condition, then the LNK LED light will light-up to indicate that this port sees the next device and everything is good.
Well, in reality, you merely held-up a mirror for your device to see itself. As long as it was satisfied that connectivity was achieved, then the port itself is in great condition.
Figuring handle length: To figure the total length CAT6 to cut, simply double the length of CAT6 wire you want protruding from the plug as a handle, then add half an inch for the connector loss, then cut. This will be folded in half, and a quarter inch of that length will be taken-up by the connector plug on each side.
My plans call for a short 1.5 Inch handle, so I double the length, then add a quarter inch the connector loss for each end (a total of .5 inches of loss overall), so I need a final length of 3.5 inches.
After cutting the cable to the desired length, separate the copper strands from the main insulation, so that you have four pairs of the individually insulated copper wire. We’re only going to use four individual wires per Loopback Plug, so pick four and put the other four aside (which you can then use to make a second loopback plug if you have another connector and dust boot).
General Layout:
Pin 1 to Pin 3
Pin 2 to Pin 6
Pin 4 to Pin 7
Pin 5 to Pin 8
Detailed Instructions: to make this Loopback plug, take your RJ45 Connector plug and insert it into your Crimper so as to hold the connector plug steady. Then insert 4 wires into pins 1, 2, 4, and 5 and then loop those same wires back into the plug and mate with pins 3, 6, 7, and 8 respectively.
While holding Crimper in one hand and pressing those same wires into Crimper with the other hand, Crimp the connector into the wires. Afterwards, wrap the looped wires in electrical tape to maximize “gripability” while also minimizing wear and tear. In my case, I had a dust boot and some external insulation wrap left, so I squeezed the external insulation back over the looped wires to provide some extra rigidity, and then pushed the Dust Boot over the insulation and wiring. I also placed a dab of plastic glue over the end of the insulation protruding from the Dust Boot and crimped it down, ensuring a good gripable surface.
This new plug will work to confirm you have good Layer-1 physical connectivity at any 10, 100, or 1000 ethernet port. Bear in mind if your equipment is in production that you’ll only want to keep this plugged-in long enough to validate that the LINK LED lights-up. Leaving the plug in the port longer on a production server might cause confuse other equipment upstream, so best to unplug once you’ve confirmed the Physical Layer. If it’s a non-production switch or router, then it shouldn’t matter.


